Welcome, fellow baking enthusiast! Today, we’re diving into the wonderful world of Focaccia Art Bread. It’s more than just a delicious Italian flatbread; it’s a blank canvas for your creativity, turning simple dough into a breathtaking edible garden. I’ve always loved how food can bring joy and connect people, and this artistic focaccia bread truly embodies that spirit.
Imagine the smiles when you present a loaf adorned with vibrant vegetables that look like they’ve blossomed right out of the dough! This isn’t just baking; it’s art, and I can’t wait to share my passion for creating these edible masterpieces with you. It’s perfect for impressing guests, a delightful addition to any meal, or just a fun baking project for a sunny afternoon.
This special focaccia art bread allows you to truly express yourself. You’ll learn how to craft a soft, flavorful Italian flatbread and then transform it with colorful vegetable toppings into stunning designs. It’s a therapeutic and rewarding baking project that culminates in a show-stopping centerpiece of decorative focaccia bread.
Table of Contents
Table of Contents
What You’ll Need: Ingredients for Amazing Focaccia Art Bread
Getting ready to bake your beautiful Focaccia Art Bread is exciting! The first step is gathering all your quality ingredients. Using fresh, good stuff makes all the difference in your delicious artistic focaccia bread. Here’s what you’ll need to create the perfect dough and decorate your edible masterpiece.
Dough Ingredients
First up, let’s talk about the base of your decorative focaccia bread – the dough. These simple ingredients come together to form that wonderfully soft and chewy Italian flatbread.
- Warm Water: 16 ounces (2 cups), divided into two bowls (around 110ºF or 43°C – think warm bathwater)
- Granulated Sugar: 1 Tablespoon
- Active Dry Yeast: 7 grams (2 ½ teaspoons)
- Olive Oil: 2 ounces (¼ cup), plus extra for the pan and drizzling
- Salt: 1 teaspoon fine sea salt
- Flakey Salt: 1 Tablespoon, for sprinkling on top
- Bread Flour or All-Purpose Flour: 24 ounces (5 cups spooned and leveled)
Topping Ingredients for Your Focaccia Art Bread Canvas
Now for the fun part: decorating your Focaccia Art Bread! These colorful veggies and herbs are your artistic tools to transform your dough into a stunning garden scene. Get ready to create some beautiful focaccia art!
- Olive Oil: 4 ounces (½ cup) for the pan and for drizzling on top of the focaccia after rising
- Fresh Rosemary: 2 Tablespoons, chopped (or other fresh herbs like thyme, oregano)
- Vegetables for Decoration:
- Cherry or Grape Tomatoes (halved or left whole)
- Bell Peppers (various colors, sliced thin into rings or shapes)
- Red Onion (thinly sliced, separated into rings)
- Black Olives (sliced)
- Scallions or Chives (for stems)
- Zucchini or Asparagus spears (thinly sliced or trimmed)
- Herbs for Stems and Leaves: Fresh parsley, cilantro, dill sprigs
Gathering all these ingredients is the first step towards creating an amazing loaf of decorative bread. If you enjoy simple, delicious baking, you might also like this easy recipe for 4-Ingredient Banana Bread with Oats!
Baking Bliss: Step-by-Step Crafting Your Focaccia Art Bread
Let’s get our hands delightfully doughy and create a stunning Focaccia Art Bread masterpiece! This whole process is about patience and love. It results in a perfectly textured, visually appealing artistic focaccia bread that will truly impress.
Step 1: Activate the Yeast
Grab one bowl and add 1 cup of warm water – it should feel like a warm bath, around 110ºF (43°C). Sprinkle in the granulated sugar, then the active dry yeast. Give it a gentle stir and let it rest for 5-10 minutes. You’ll know your yeast is happy and alive when it gets nice and foamy on top. This bubbly goodness is ready to make your focaccia art rise!
Step 2: Combine Wet Ingredients
In a large mixing bowl, or the bowl of your stand mixer, pour in the remaining 1 cup of warm water, ¼ cup of olive oil, and 1 teaspoon of fine sea salt. Now, carefully add your foamy, activated yeast mixture to these wet ingredients. Everything is coming together for your delicious focaccia art bread dough!
Step 3: Mix the Dough
Start adding the flour to your wet ingredients, one cup at a time. Mix it either with a sturdy wooden spoon or use a dough hook on low speed if you have a stand mixer. Keep mixing until a shaggy, somewhat rough dough forms. Don’t stop there! Continue mixing for another 5-7 minutes. The dough should become smooth and elastic, though it will still be quite wet and sticky. That stickiness is perfect for a truly fantastic focaccia art bread.
Step 4: First Rise
Lightly coat a clean, large bowl with a little olive oil. Transfer your smooth, sticky dough into this bowl, turning it over once to make sure it’s fully coated. Now, cover the bowl tightly with plastic wrap or a clean kitchen towel. Find a warm spot in your kitchen and let the dough rise for 1-2 hours, or until it has clearly doubled in size. This slow, patient rise is crucial for developing the amazing flavor and airy texture of your decorative focaccia bread. For another fantastic bread project that emphasizes a good rise, try our Gluten-Free Sourdough Bread Recipe!
Step 5: Prepare the Pan
Pour ½ cup of good quality olive oil into a 9×13 inch baking pan. If you have a larger half-sheet pan, that works wonderfully too! Tilt the pan gently to ensure the entire bottom and all the sides are well-coated with that glorious oil. This prevents your artistic focaccia bread from sticking and helps create that irresistible, crispy bottom crust we all love.
Step 6: Transfer and Dimple the Dough
Once your dough has had its first rise, gently transfer it into the prepared, oily pan. Be careful not to punch all the air out – try to keep some of those lovely bubbles! Gently press and stretch the dough with your fingertips to fill the pan evenly. Now, use your fingers to create deep dimples all over the surface. These dimples are essential; they trap the olive oil and create those delightful airy pockets inside your Focaccia Art Bread.
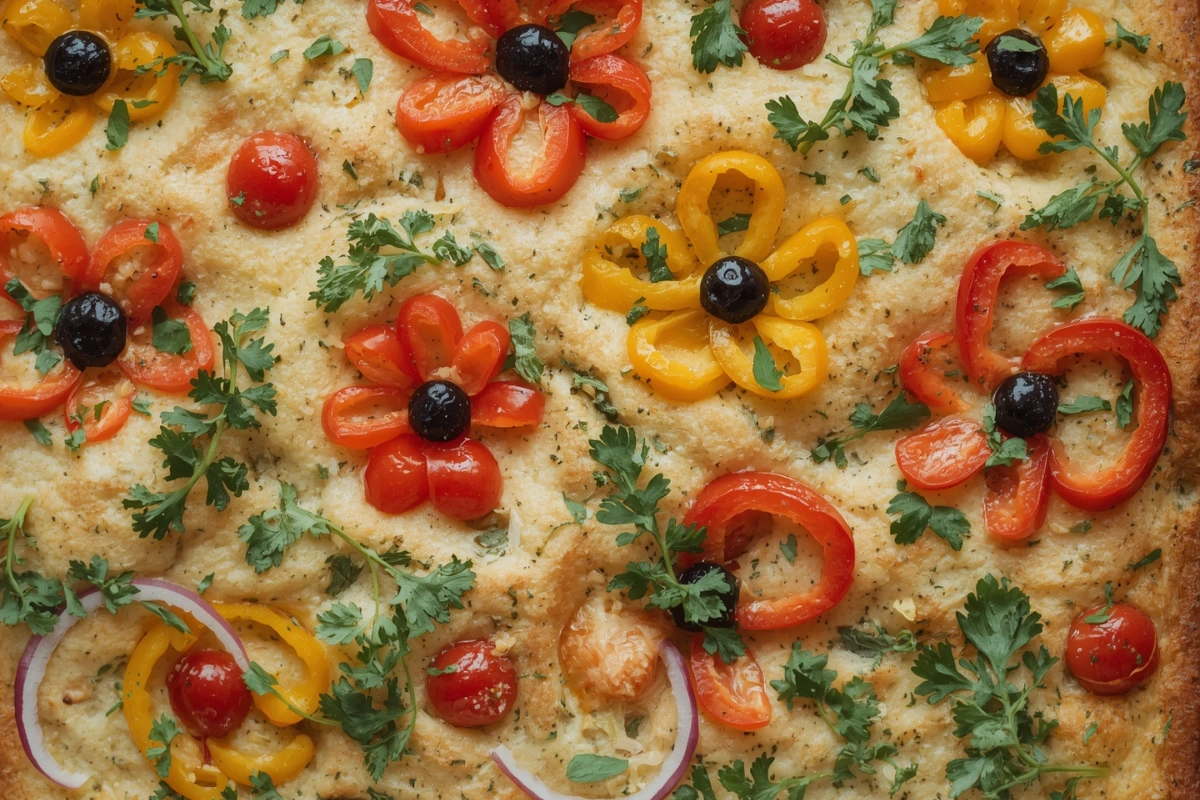
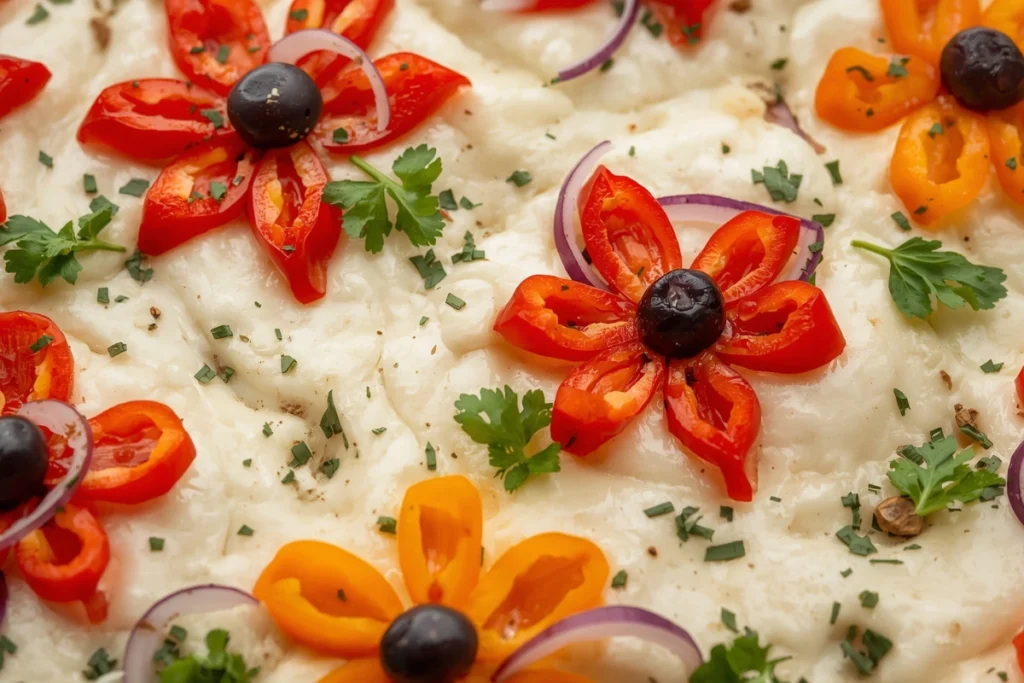
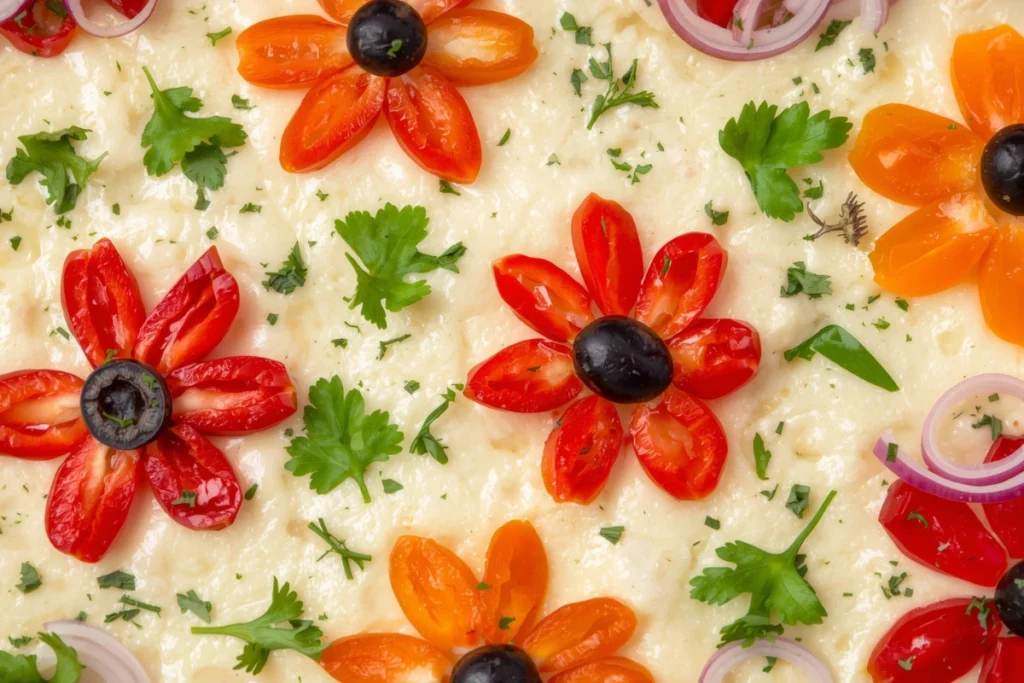
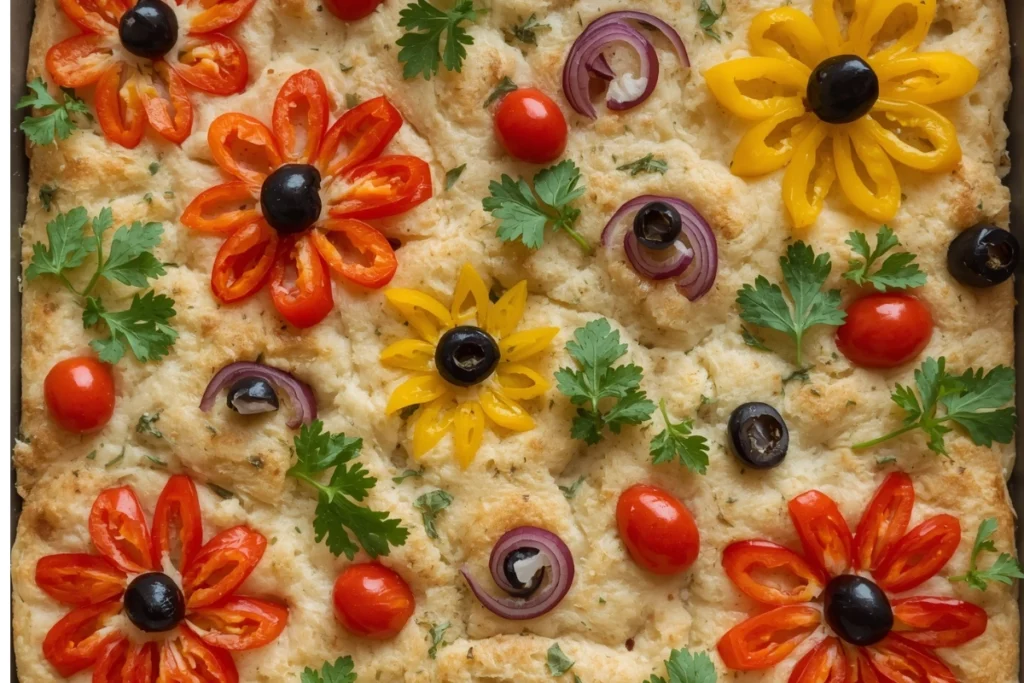
Step 7: Second Rise and Decorate Your Focaccia Art Bread
Cover the pan loosely again with plastic wrap or a kitchen towel. Let the dough enjoy its second rise in a warm spot for about 30-45 minutes. During the last 15 minutes of this rising time, preheat your oven to 400°F (200°C). This is it – the moment for creativity! Arrange your prepped vegetables and herbs on the dough’s surface to design a beautiful garden scene. Think colorful flowers, green stems, and leafy accents. Let your imagination bloom as you craft your unique focaccia art! Creating this kind of visual appeal is similar to how we make our delightful Blueberry Banana Bread Recipe look so inviting.
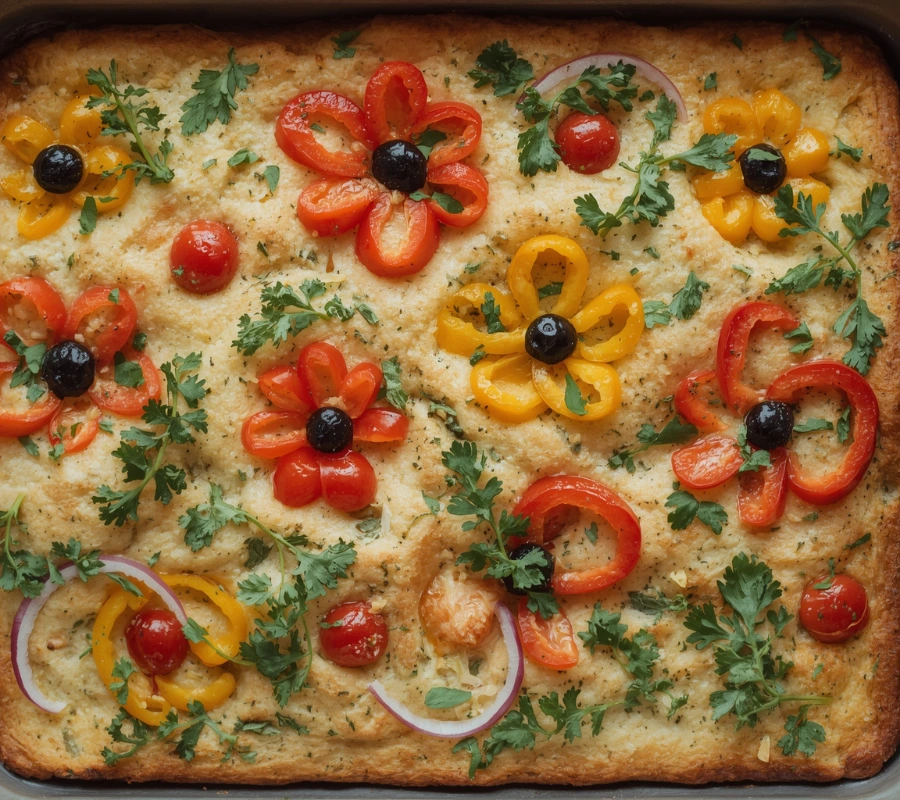
Step 8: Bake Your Focaccia Art Bread
Once your decorative focaccia bread is fully adorned, drizzle a little more olive oil generously over the entire surface, especially on the vegetables. Then, sprinkle it with the flakey salt and chopped rosemary. Carefully place your artistic focaccia bread into the preheated oven. Bake for 20-30 minutes, or until the top is a beautiful golden brown and the focaccia is cooked through. Watch closely, since oven temps may differ.
Step 9: Cool and Serve
Your magnificent Focaccia Art Bread is ready! Carefully remove the pan from the oven. Let the focaccia cool in the pan for just a few minutes, then transfer it to a wire rack to cool completely. This important step prevents the bottom from getting soggy. Once cooled, slice into your masterpiece and enjoy every delicious, artful bite!
Chef’s Secrets for Perfect Focaccia Art Bread
Making beautiful and delicious Focaccia Art Bread is a true joy! With just a few insider tips, you’ll be baking like a seasoned pro. These secrets will help elevate your artistic focaccia bread to new heights, ensuring perfect results every time.
Dimple with Love
When it’s time to dimple your dough, don’t be shy! Those deep depressions are where the olive oil pools, creating incredible flavor and a delightful texture. This step also helps prevent really large air pockets from forming during baking, giving your decorative focaccia bread a more even crumb.
High-Quality Olive Oil
Olive oil is a superstar ingredient in focaccia. Using a good quality extra virgin olive oil truly makes a huge difference in the overall flavor of your Focaccia Art Bread. It’s what gives it that rich, authentic taste.
Don’t Overcrowd Your Art
While it’s super tempting to load up your focaccia art with all the beautiful veggies, try not to overcrowd the surface. Too many toppings can weigh down the dough, stopping it from rising properly. Aim for a nice balance of beauty and functionality for your artistic focaccia bread.
Possible Substitutions
- Flour: Bread flour gives a chewier texture, but all-purpose flour works perfectly well for a great focaccia.
- Yeast: If you have instant yeast, you can use it directly! Just mix it with the dry ingredients; no separate proofing needed.
- Herbs: Feel free to experiment with your favorite fresh herbs like thyme, oregano, or sage instead of rosemary on your focaccia art. They all add wonderful flavor! For more creative bread ideas, check out our amazing Sourdough Pumpkin Bread.
Recipe Variations for Your Focaccia Art Bread Masterpiece
The true beauty of Focaccia Art Bread is how endlessly customizable it is! Once you’ve mastered the basic dough, the creative possibilities for your artistic focaccia bread are truly boundless. You can play with flavors and designs to make each loaf unique.
Seasonal Gardens
Tailor your focaccia art to the seasons for fresh, vibrant tastes. In spring, delicate asparagus spears and thinly sliced radishes look beautiful. For summer, highlight juicy heirloom tomatoes and fresh basil. Autumn welcomes earthy mushrooms and vibrant squash, while winter can feature caramelized onions and olives for a more rustic decorative focaccia bread design.
Savory & Sweet Combinations
While most focaccia art is savory, feel free to experiment with sweet touches! A lightly sweetened dough with sliced figs, fresh rosemary, and a drizzle of honey makes a unique and delicious Focaccia Art Bread. You could also try a sophisticated pear and gorgonzola pairing. If you love sweet and savory, you’ll adore our Lemon Cranberry Bread!
Mediterranean Flair
Embrace those classic Mediterranean flavors on your Focaccia Art Bread. Top your decorative focaccia bread with sun-dried tomatoes, salty capers, crumbled feta cheese, and a sprinkle of za’atar. This style of artistic focaccia bread always tastes like a sunny escape.
Theme-Based Designs
Beyond simple flowers, think about other fun themes for your focaccia art! Create a tiny landscape with herb “trees” and veggie “bushes.” Or, for a special occasion, you could even try spelling out a name or a festive message using thin strips of vegetables on your Focaccia Art Bread. The sky’s the limit for your imagination! For more inspiration on how to make your focaccia look like a true work of art, check out this great resource: How to Decorate Focaccia Bread Like a Work of Art.
A Story from My Kitchen: The Joy of Focaccia Art Bread
I remember the first time I truly fell in love with Focaccia Art Bread. It was during a quiet Sunday afternoon, years ago, and I was feeling a bit creatively stuck. I had a batch of focaccia dough ready and a fridge full of colorful vegetables, and I just started playing.
I began slicing bell peppers into petal shapes, arranged cherry tomatoes as bright berries, and used slender chive pieces for delicate stems. As I pressed each piece into the soft dough, it felt less like cooking and more like painting. It was a wonderful feeling, creating an edible garden right on the dough surface.
When it finally came out of the oven, golden and incredibly fragrant, it wasn’t just bread. It was a vibrant, edible garden, a true masterpiece of artistic focaccia bread. My kids, who usually just grab a slice, stood in awe, pointing out the “flowers” and “bushes.” Even my partner, usually a bit reserved, gasped and asked, “You made this?!”
That simple act of transforming dough into this beautiful Focaccia Art Bread brought such an unexpected wave of joy and connection. It became an instant favorite at our table, not just for its amazing taste, but for the way it brought smiles and wonder. That day taught me that food, especially artistic focaccia bread, isn’t just about sustenance; it’s about art, love, and creating unforgettable moments. Every time I bake a decorative focaccia bread now, I feel that same spark of magic. It’s a feeling I also get when I make our delightful Lemon Blueberry Sourdough Bread.
Frequently Asked Questions (FAQ)
What makes focaccia bread different?
Focaccia Art Bread truly stands out from other breads because of its unique texture and how we prepare it. Unlike many traditional loaves, focaccia is a flatbread, famous for its dimpled surface and generous use of olive oil. It boasts a light, airy crumb with a slightly crispy crust. The dough’s high water content gives it that characteristic chewiness. What makes focaccia art especially unique is its visual appeal, turning a simple bread into a stunning, edible landscape. It’s a truly special culinary canvas.
What exactly is focaccia bread?
Focaccia Art Bread is a flat, oven-baked Italian bread. It’s often seasoned with olive oil and fresh herbs, and sometimes topped with other delicious ingredients. Focaccia can be thick or thin, crispy or soft, depending on where it’s made and the specific recipe. People believe it’s an ancient bread, possibly from the Etruscans or ancient Greeks. Today, it’s a versatile favorite, serving as an appetizer, a side dish, or even a tasty base for sandwiches. Our artistic focaccia bread version elevates it to a beautiful show-stopping centerpiece. For another fantastic example of decorated focaccia, you might enjoy exploring this recipe: Decorated Focaccia Bread.
Is focaccia bread healthy?
Like many delicious baked goods, Focaccia Art Bread can definitely be enjoyed as part of a balanced diet. It’s mainly made from flour, water, yeast, olive oil, and salt. While olive oil provides healthy fats, and the added vegetables for focaccia art boost nutrients, it’s still a calorie-dense food. Its “healthiness” really depends on your portion size and what you eat it with. When you make artistic focaccia bread with fresh, whole ingredients and lots of colorful veggies, it offers fiber and vitamins, making it a more wholesome choice than some highly processed breads.
How to keep focaccia art from burning?
To prevent your beautiful Focaccia Art Bread from burning, especially those delicate vegetable toppings, I have a few key tips. First, always make sure your oven temperature is accurate; an oven thermometer can be a real helper here. If you notice your focaccia art browning too quickly on top before the dough is fully cooked, just lightly tent it with aluminum foil for the last 10-15 minutes of baking. Also, ensure your vegetables aren’t sliced too thinly, or they might crisp up too fast. A little extra drizzle of olive oil over the veggies before baking can also protect them from direct heat and keep them from burning on your decorative focaccia bread.
Conclusion: Share Your Focaccia Art Bread with Love
There’s truly nothing quite like the satisfaction of pulling a gorgeous Focaccia Art Bread out of the oven. The incredible aroma, the perfectly golden crust, and those vibrant, edible blooms—it’s a feast for all the senses! I truly hope you feel inspired to get creative in your kitchen and try your hand at this wonderful artistic focaccia bread.
Remember, baking is all about joy, experimentation, and sharing with others. Don’t be afraid to make it completely your own; every decorative focaccia bread is a unique masterpiece. So, go forth, bake with passion, and share your beautiful focaccia art with those you love. Happy baking, everyone!
Print
Focaccia Art Bread: Delicious, Gorgeous in 9 Steps!
- Total Time: 2 hrs 10 minutes
- Yield: 12 servings
Description
Create beautiful Focaccia Art Bread! This guide makes baking artistic focaccia easy, turning dough into a delicious, edible garden. Perfect for sharing.
Ingredients
- 16 ounces Warm Water (2 cups)
- 1 Tablespoon Granulated Sugar
- 7 grams Active Dry Yeast (2 ½ teaspoons)
- 2 ounces Olive Oil (¼ cup)
- 1 teaspoon fine sea salt
- 1 Tablespoon Flakey Salt
- 24 ounces Bread Flour or All-Purpose Flour (5 cups spooned and leveled)
- 4 ounces Olive Oil (½ cup) for pan and drizzling
- 2 Tablespoons Fresh Rosemary, chopped
- Cherry or Grape Tomatoes
- Bell Peppers (various colors)
- Red Onion
- Black Olives
- Scallions or Chives
- Zucchini or Asparagus spears
- Fresh parsley
- Fresh cilantro
- Fresh dill sprigs
Instructions
1. In one bowl with 1 cup of warm water (around 110ºF or 43°C), sprinkle the sugar and then the yeast. Give it a gentle stir and let it sit for 5-10 minutes until it becomes foamy.
2. In a large mixing bowl (or the bowl of a stand mixer), combine the remaining 1 cup of warm water, ¼ cup olive oil, and 1 teaspoon of fine sea salt. Add the activated yeast mixture to this bowl.
3. Gradually add the flour, one cup at a time, mixing with a wooden spoon or a dough hook on low speed. Mix until a shaggy dough forms. Continue to mix for another 5-7 minutes until the dough is smooth and elastic. It should be a relatively wet and sticky dough.
4. Lightly grease a large bowl with olive oil. Transfer the dough to the bowl, turning it once to coat. Cover the bowl tightly with plastic wrap or a clean kitchen towel. Let the dough rise in a warm place for 1-2 hours, or until it has doubled in size.
5. Pour ½ cup of olive oil into a 9×13 inch baking pan (or a similar size, like a half-sheet pan). Tilt the pan to ensure the entire bottom and sides are coated with oil.
6. Gently transfer the risen dough to the prepared pan. Gently press and stretch the dough to fill the pan, being careful not to tear it. Use your fingertips to create deep dimples all over the surface of the dough.
7. Cover the pan loosely with plastic wrap or a kitchen towel. Let the dough rise again for 30-45 minutes in a warm spot. During the last 15 minutes of this rise, preheat your oven to 400°F (200°C). Arrange your chosen vegetables and herbs on the surface of the dough to create a beautiful garden scene.
8. Once decorated, drizzle a little more olive oil over the entire surface of the focaccia art bread, especially over the vegetables, and sprinkle with flakey salt and chopped rosemary. Bake for 20-30 minutes, or until the focaccia is golden brown on top and cooked through.
9. Once baked, carefully remove the Focaccia Art Bread from the oven. Let it cool in the pan for a few minutes before transferring it to a wire rack to cool completely. Slice and enjoy your masterpiece!
Notes
Chef’s Secrets: Dimple the dough deeply for flavor and texture. Use high-quality extra virgin olive oil. Avoid overcrowding toppings to allow proper dough rise.
Possible Substitutions: All-purpose flour can replace bread flour. Instant yeast can be mixed directly with dry ingredients. Experiment with other fresh herbs like thyme, oregano, or sage.
Recipe Variations: Create seasonal garden designs, explore savory and sweet combinations (e.g., figs, rosemary, honey), Mediterranean flair with sun-dried tomatoes, capers, feta, or theme-based designs beyond flowers.
- Prep Time: 20 minutes
- Cook Time: 30 minutes